 |
| "Mana sambungan post sebelum nih haaa?? tak sabar iol nak baca laaaa." *ayooo mode Angry Bird betina sgtsss |
Yelaaa, nak cite laa nih. tak sabar-sabar nih.
Okay. Ini laa sambungan daripada entry sebelum ni, *matilaa kemaruk post dua entry dalam satu hari!!...
Tak lengkap rasanya bila dah makan-makan tapi tak der dessert. It is also incomplete when people come to Mulberry Cottage without having dessert. Dessert is a MUST!
So an hour before the guests arrived, iol went into my heaven's kitchen to find out what I have for dessert. So I decided to bake brownie. And also found an easy brownie recipe in my cooking binder. The results reveled that *macam bentangkan hasil scientific research ..the guests loved the brownie I baked so much..sampai ada yang bawak balik and had breakfast with it the next day *mode naik stage dah ON :)
Iol had some positive comments *which is great..BUT iol also have my own comments and feelings about the brownie I baked. So, Iol decided to bake again and improve the recipe. The results?? jeng jeng jeng.. I LOVE this one MORE!!
Here iol show you guys how it was done.
 |
| The Ingredients |
Use the best quality ingredients if you can. Kalau tak, yang murs-murs pun ok but you have to try the recipe until you get the taste that you expected :))
Cut the butter into small cubes and break the chocolate into small pieces. Then, tip them into a medium bowl. Sit the bowl on top of a small saucepan fill with a quarter full of water with a low heat to melt the butter and chocolate. You must ensure the bottom of the bowl did not touch the hot water.
Step 2
Occasionally, stir the mixture to mix them well. When it is done, leave the melted mixture to cool to room temperature
Step 3
While waiting for the chocolate mixture to cool, break the eggs into a mixing bowl and tip in the sugar. Using an electric mixer *well mine is Kitchen Aid..*matilaa riak :), whisk the eggs and sugar in a maximum speed until they look thick and creamy. How would you know? The mixture volume will double in size and they look pale.
Step 4
Sieve the the cocoa powder and flour into a bowl. This is to ensure that we get rid off all of the lumps.
Step 5
Pour the cooled chocolate mixture over the eggs and sugar mixture. Then, gently fold together with a rubber spatula until the mixture color is a mottled dark brown.
Step 6
Tip in the flour and cocoa powder into the bowl. Gently fold them together with the chocolate mixture. Avoid overdoing the mixing.
Step 7
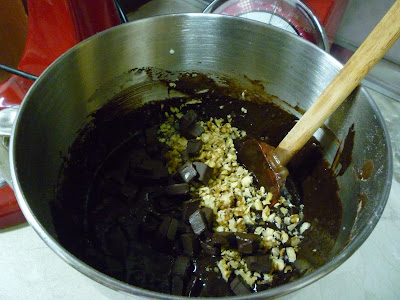
Stir in the chopped walnut and chocolate chunks into the mixture until they are dotted throughout.
Step 8
Prepare a shallow 20cm square tin and line the base with baking parchment. Pour the mixture into prepared tin and scrap out every bit of the bowl with the spatula. Put in the heated oven, 160C/gas 4 for 25-30 minutes.
Step 9
When it is cooked, leave it in the tin until it is completely cold. Then, take it out from the tin and remove the baking paper. Serve on a plate and cut the brownies into squares.
 |
| Yummmylicious! A fudgy and decadent brownies, studded with extra chunks of chocolate and chopped walnut. |
What I like about this batch of brownies is the runny extra chocolate chunks in the middle (see the pic above) when I cut the brownies. It soft and dense in the middle but firm outside. It surely melts in your mouth and best to serve with a scoop or two good quality vanilla ice-cream. Heavenly!!! I sure make this brownies over and over again. :))
 |
| "Bole tak uolss buatkan untuk mek punyer 30th Birthday?? Kanda William suker sgts Brownies tapi mek tak reti buat" *Boleh uolss..sambil sujud merafak sembah |
Ciao Bella!


Detail ingredients please. Mana nak cari all purpose flour tu? Baca blog entry ni terus rasa mcm nak perasap oven. Drool! X ina
ReplyDeletenanti I email ok? Thanks for reading my blog ..:)
ReplyDeleteooo yg ni ler yg kita makan reramai sekali hadap tu kat penang ekk
ReplyDeleteyer Zack :-P
ReplyDelete